Glitter and grit belong at this bachelorette—you want crafts that look sweet and work hard. Set up simple stations, label supplies, and stash a fix-it kit. Think sashes, vinyl tumblers, a flower crown bar, photo props, and a Polaroid garland, with quick wins like scratch-off cards and spa kits. It’s easy, if you know the order to do things and the one tool folks always forget—let’s talk before the glue dries.
Key Takeaways
- Personalized bridal and attendant sashes: measure shoulder-to-hip, cut diagonally, tiny snap join; follow title etiquette; pack safety pins, lint roller, stain pen.
- DIY veil bar: tulle, combs, hot glue; test length before trimming; offer blusher, birdcage, fingertip, chapel, cathedral; match tulle color and edge style.
- Custom drinkware and stir sticks: wipe with alcohol, burnish vinyl, peel low angle; use food-safe materials; assemble toppers cleanly; stress-test durability in ice water.
- Photo nook and instant guestbook: two clamp lights, diffuser, reflector; rotate props hourly; Polaroid garland layout with gaps; keep backup battery, tape, wipes.
- Favors and keepsakes: hangover kit pouches with electrolytes, pain relievers, extras; memory jar with prompt cards; DIY flower-crown bar with wire and ribbon techniques.
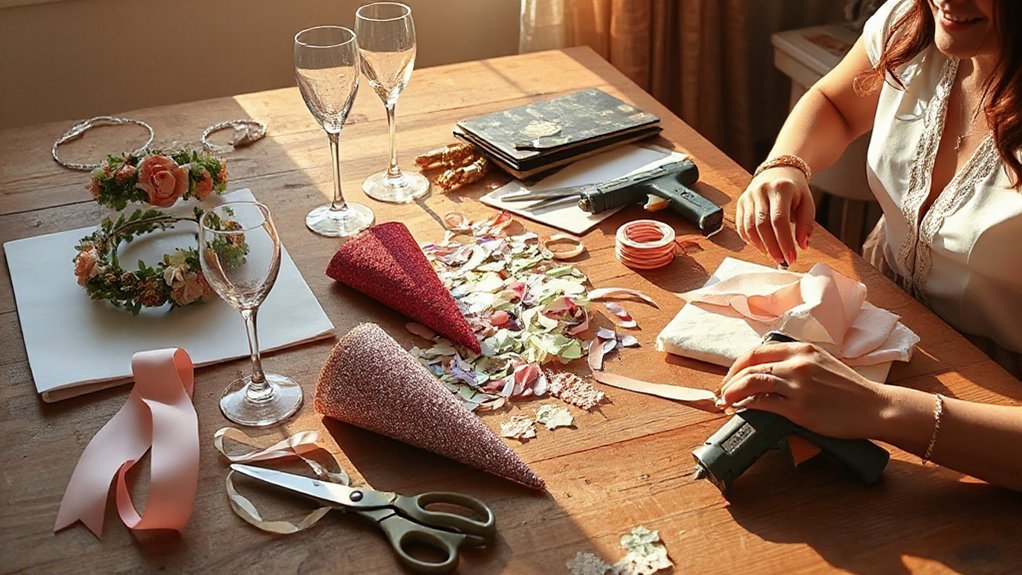
Personalized Bridal Party Sashes
Starting with a sash is the easiest way to make the bride feel special without blowing your budget or your Saturday. You grab ribbon or satin yardage, print vinyl letters or paint them by hand, and you’ve got a bold stripe that says Bride and keeps the photos tidy. Follow simple sash etiquette: the bride’s text goes big and front, attendants get slimmer lines, no joke titles unless she nods first. Use a quick sizing guide—measure shoulder to hip, add four inches for overlap, and cut on a diagonal so it lies flat and doesn’t fight you. Fuse or stitch the join, then add a tiny snap for easy on‑off, because hair happens. Test drape on a tee, check glare under indoor lights, and adjust color so it pops, not shouts. Pack safety pins, a lint roller, and a stain pen; they’re the little backups that save face.
Custom Vinyl Drink Tumblers
Even if you’ve only got an hour before dinner, custom vinyl tumblers pull the crew together and keep drinks straight without a lot of fuss. Grab stainless or glass cups, pick a clean font, and cut names plus one small icon, like a wave for the beach run, then weed and stick with firm, slow pressure. Wipe the surface with alcohol first, because oils are sneaky and ruin grip. Burnish over the curves with a squeegee or your thumb, then peel the transfer at a low angle, like you mean it. Do quick durability testing: ice bath, towel rub, a ride in the tote, and see what lifts. If edges lift, hit them with gentle heat and press again. Want eco options? Choose metal bodies, bamboo lids, and silicone straws, and skip glitter. Pack a paint pen for late arrivals, because someone always pops in hot and nameless.
DIY Flower Crown Bar
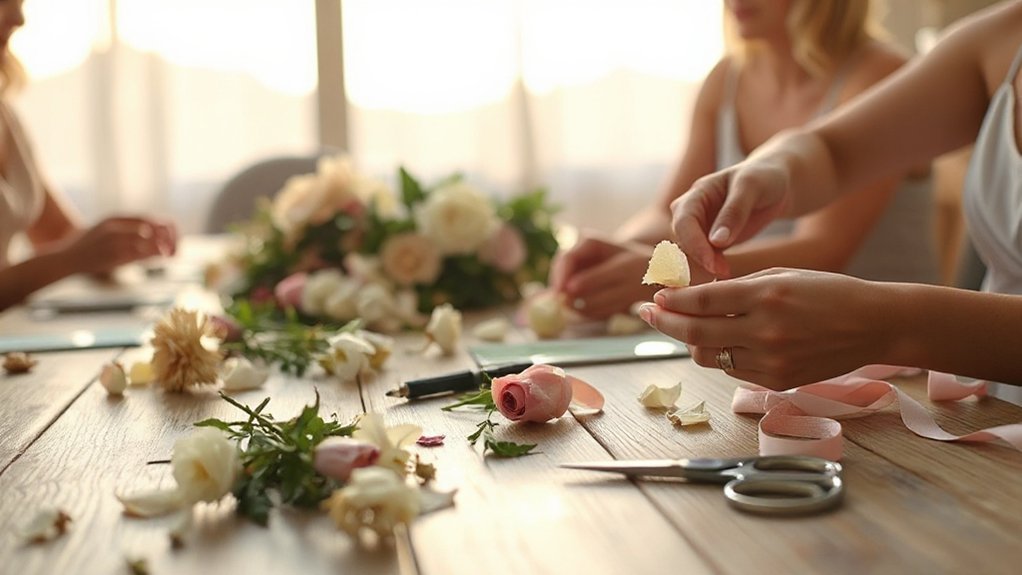
With the tumblers sorted and everyone sipping the right drink, shift the table to blooms and make a DIY flower crown bar that runs itself. Lay out trays of seasonal florals, some fresh, some dried, plus greens that bend without fuss. Pre-cut vine or wire bases, set snips and floral tape in small cups, and label steps so guests glide without asking. Show two smart wire techniques: wrap the stem tight to the base, or make tiny hairpin “U”s and stitch petals in, neat and quick. Add ribbon tails for folks who like a soft finish, and a few clips for short hair, because yes, it matters. Keep a scrap bowl and a wipe cloth, trust me, they save time. You demo one crown, then let them play. Invite swaps, praise odd mixes, and watch shy hands get brave when their crown actually fits. Simple, quick, and joyful.
Photo Booth Props and Backdrops
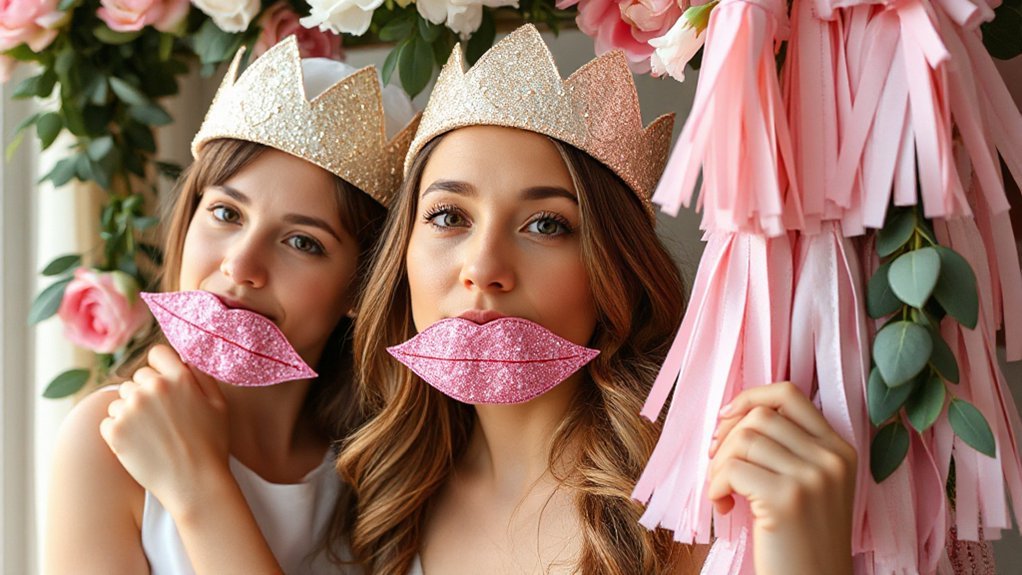
How do you get photos everyone actually wants to keep? You set up a photo nook that feels made, not rented, with props that match the bride’s story and a backdrop that flatters real faces. Start with Theme Coordination: pick one thread—desert disco, coastal picnic, retro motel—and echo it with three prop types, like mirrored sunnies, a felt pennant with her nickname, and a tiny neon sign. For backdrops, use a fabric drop cloth, staple on fringe, then layer a bold shape cut from foam board; it packs flat and pops fast. Lighting Tips matter more than pricey cameras, so hang two clamp lights at head height, add sheer parchment as a diffuser, and bounce light off a white foam core board. Set marks with painter’s tape, keep a lint roller and wipes nearby, and rotate props every hour so fresh stuff nudges new poses, easy as pie.
Hand-Painted Champagne Bottles
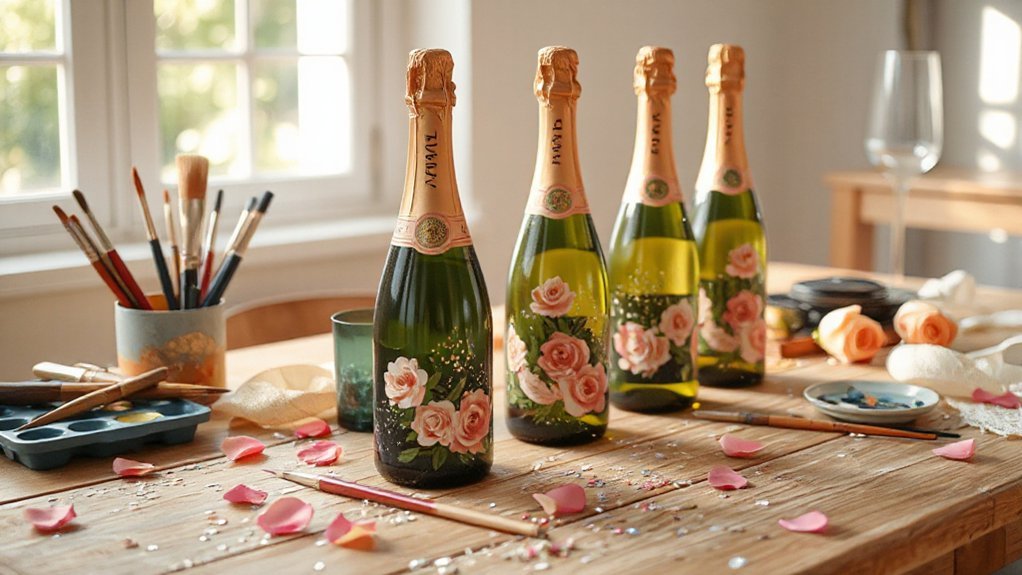
Painting champagne bottles turns a plain sip into a keepsake you can actually hand over with a grin, and it’s easier than it looks if you set yourself up right. Start by soaking the label off, scrub the glue with baking soda and oil, then wipe with alcohol so paint sticks. Mask the lip and the cork wrap, because nobody wants flakes near a toast. Prime with a thin coat, then layer acrylic enamel, using painter’s tape, stencils, and bold color blocks. Add a metallic swoosh or a clean monogram, and a tiny date by the heel, like a wink. Let it cure, then seal with a clear, dishwasher-safe finish.
Now play with centerpiece lighting: drop in fairy lights on empties, or halo the neck with a soft LED ring. It’s slick-looking and frugal, thanks to recycling ideas. You’ll line a table quick, and each bottle tells yours.
Hangover Kit Favor Bags
Packing tiny “morning-after” bags saves the day when the sparkle wears off, and you’ll look like the friend who thought ahead instead of the one hunting for crackers at dawn. Start with a small zip pouch, label it with each guest’s name, and tuck in rehydration solutions, like electrolyte powder sticks and a foldable water packet, because speed matters. Add pain relievers in mini packets, a couple ginger chews, and a salty snack that won’t crumble to dust. Slip in overnight remedies, such as eye gel patches and a tiny face mist, so everyone can rally fast and feel human. A spare hair tie, blotting papers, and a mint strip earn quiet cheers. If you want data, think survival rate: a bag in hand beats a sleepy store run. Stack the kits by the door for grab-and-go, and you’ll watch people smile even before the first toast tonight.
Temporary Tattoo and Glitter Bar
Once the survival bags are stacked by the door, set up the fun: a temporary tattoo and glitter bar that lets everyone glow on purpose instead of by accident. Lay out metallic tattoos, skin-safe glue, chunky and fine glitter, cotton pads, and a little mirror, then post simple Application tips on a card. Pick clean, dry skin, dab a bit of alcohol, press the tattoo with a wet cloth for 30 seconds, and seal edges with clear balm so it lasts through sweat and hugs. For glitter, swipe a thin glue stripe, tap on color, and mist a setting spray, because yes, dancing happens.
Give folks choices: moons, initials, or a cheekbone shimmer like stardust after sunset. Keep a “whoops” station with tape to lift stray sparkle, plus gentle Removal techniques: oil, warm water, and patience. You’ll send everyone out shining, not shedding, which is a small mercy.
Memory Jar With Love Notes
Gathering the small, true moments in a jar turns them into something you can hold, which is the whole point here. You set out blank cards and a good pen, then offer simple Emotion prompts, like first time you met, best road snack, or the joke that still sticks. People write fast when you make it easy, and you’ll get the real stuff, not greeting-card fluff.
Pick a wide-mouth glass jar, nothing fussy, and add a strip of ribbon or a paint pen label so it feels claimed. Fold notes once, tuck in a dried flower or a ticket stub if it fits, and layer them like quiet confetti. Read one or two that night, save the rest for a slow morning later on.
For Sealing techniques, use a cork or clamp lid, then wax the edge or run a clean bead of clear glue, tidy and tamper-proof.
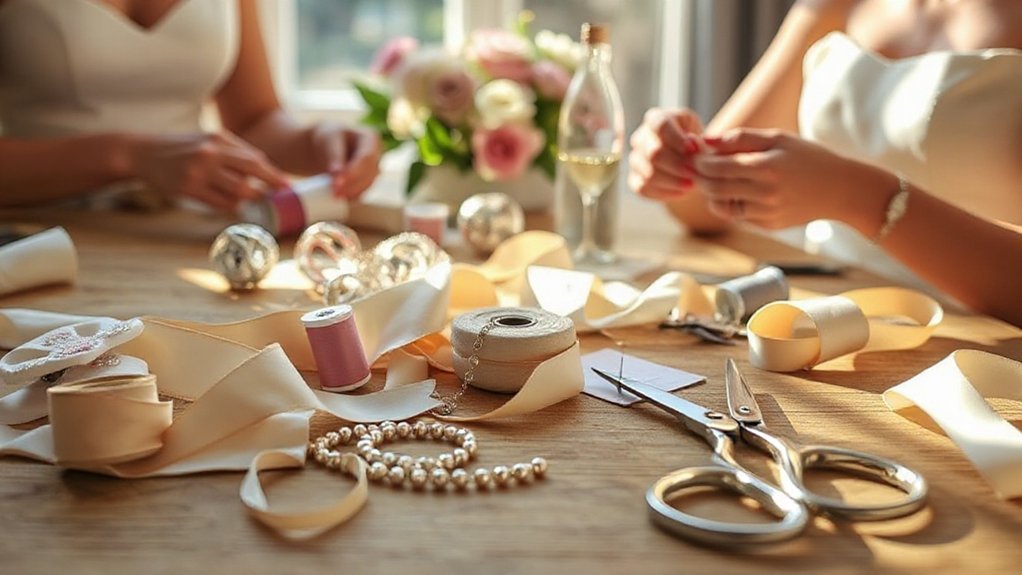
Bride’s Veil Craft Station
Set up a sturdy table with rolls of tulle, hair combs and clips, fabric scissors, hot glue with extra sticks, ribbons, pearls, mini flowers, and a couple hand mirrors, then lay a trash bag under it all because stringy glue has a mind of its own. You can make quick birdcage veils with netting and a clip, sweet elbow-length veils with two layers of tulle on a comb, or a long “cathedral” just for photos and laughs, and you’ll see fast which one fits her mood. Personalize with a satin bow in her wedding color, iron-on initials, tiny charms stitched at the comb, or a line of pearls along the edge, and test the length with a quick spin and snapshot so you don’t trim an inch you’ll miss later.
Materials and Setup
A simple veil station works best when you lay out the right tools in the right spots, so think sturdy table, good light, and a chair for each guest with elbow room to spare. Set a clear workspace layout: mats in front, shared bins in the middle, trash on the right, finished pieces on the left, like lanes on a road. Stock tulle rolls, metal combs, alligator clips, floral wire, zip ties, fabric glue, low-temp glue guns, needles, thread, ribbons, pearls, and tiny pliers. Add measuring tapes, pinking shears, safety pins, and painter’s tape for quick labels. Post simple safety precautions—glue guns parked on stands, cords taped down, finger guards nearby, bandaids handy. Keep drinks off the table—glue doesn’t pair well with rosé, anyway.
Veil Style Ideas
Why not start with the bride’s vibe and build the veil to match, because that’s how it actually works at this table. If she loves a dash-and-go entrance, you reach for a blusher veil that flips down quick and lifts even quicker, like a wink you can keep. If she’s leaning big and timeless, a cathedral veil trails behind with quiet swagger and straight-line grace, and it photographs like a story you can stand inside. Somewhere between, fingertip or chapel length keeps movement easy, chairs friendly, and dance spins safe. Birdcage nets add snap and city spark, while waterfall cuts pour soft and light and sure.
| Style | Length | Vibe |
|---|---|---|
| Blusher | Short | Flirty |
| Birdcage | Short | Retro |
| Fingertip | Mid | Easy |
| Chapel | Long | Classic |
| Cathedral | Ultra-long | Grand |
Personalization Tips
Now that you’ve picked her vibe, stitch in her story so it feels like her and not just “a veil.” Start with the base: match tulle to the dress (ivory isn’t the same as white, and cream can go yellow under lights), then choose an edge that fits the mood—raw cut for easy breezy, skinny satin for crisp, a pencil edge for that soft outline that photographs clean.
Pin a tiny date tag under the comb, hidden but sweet. Test Monogram Fonts on scrap; thick strokes blur, thin lines stay sharp. Build Color Palettes from bouquet greens and petal shades. Add crystals near the crown like dew. Use low-heat vinyl with a press cloth. Stop early; simple looks truly custom and avoids last-minute fixes.
Beaded Friendship Bracelets
Roll up your sleeves and string a set of beaded friendship bracelets that doubles as party fun and a sweet takeaway, the kind folks keep wearing long after the confetti’s swept up.
Set out trays of seed beads, a few pearls, and chunky letters, and pre-cut cords to 12–14 inches so no one fights scissors. Tape one end, add a stopper bead, and start threading. Teach two smart Knot techniques: a tidy surgeon’s knot for stretchy cord and a sliding square knot for easy fit. Offer Pattern inspiration that nudges, not nags: a blush-to-rust ombré, a “something blue” trio, or Morse code that hides an inside joke. Go simple—one pop bead, two neutrals, repeat. If a string kinks, roll the beads between your fingers and keep going. Seal knots with a pinhead of glue, let them cure while you toast, trade bracelets like a promise you can keep.
Customized Canvas Totes
With wrists jingling from fresh bracelets, turn the table to blank canvas totes and give everyone a bag they’ll use past the weekend, not just post for a minute. Lay out stencils, markers, and tape, and set a calm, honest pace, because slow passes look cleaner than rush jobs. If the bride runs a shop, nod to business branding with a tiny logo, or add a QR code to the weekend album. Try eco dyeing with avocado pits or leaves for soft, lived-in color that hides scuffs and tells a story the photos miss.
- Prime the tote: wash it, iron it flat, and slip cardboard inside.
- Print and press: freezer-paper stencils with fabric paint, or iron-on vinyl.
- Eco dyeing: bundle leaves and pits, steam, and unwrap slow for leaf ghosts.
- Finish smart: stitch a date label, add a pocket, and mist on fabric guard.
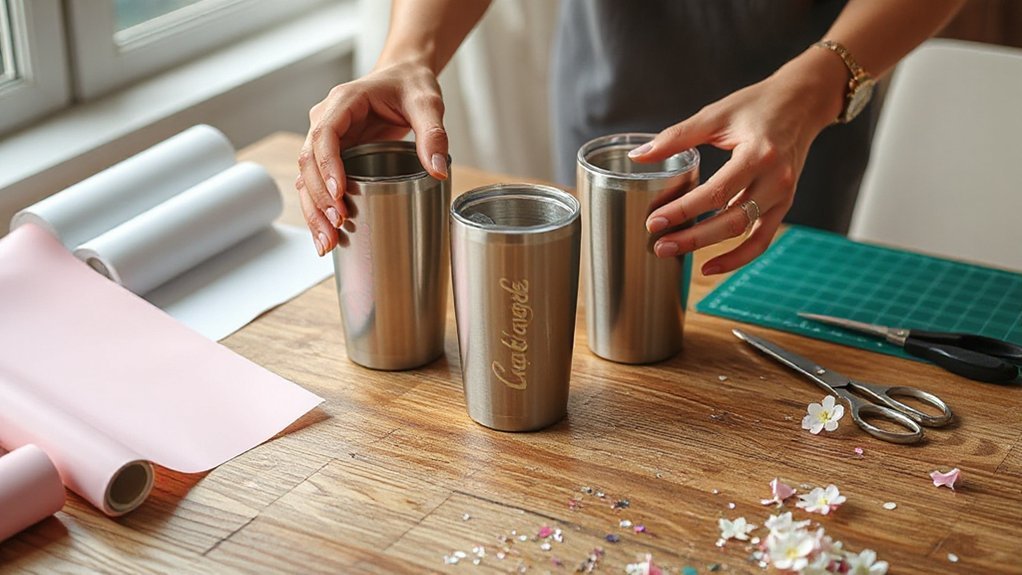
Signature Cocktail Stir Sticks
You’re making signature cocktail stir sticks, so start with food-safe bits like acrylic sticks, sealed wood, or paper toppers that won’t bleed color into a drink, because no one wants a mojito that tastes like markers. Add simple personalization that pops—names or nicknames in vinyl, tiny photo circles of the bride and crew, or charms shaped like rings and peaches, easy to spot across a crowded bar. Then assemble in a snap: stick on the decals, glue the topper with food-safe adhesive, let it cure flat for an hour, and line them up in a jar so they’re ready for clinks and cute photos.
Food Safe Materials
Before you get cute with colors and monograms, make sure every part that touches the drink is actually food safe. Use FDA-compliant plastic or stainless for the shaft, and skip woods that swell. If you cast toppers, use platinum-cure silicone molds and a resin rated for incidental food contact, and keep unsealed edges out of the liquid. Lock finishes with non toxic sealants made for barware, not craft varnish. Wash pieces before first pour, rinse, air-dry, and test one in seltzer; if it clouds or smells, you start over.
- Read datasheets for FDA or EU food-contact claims.
- Keep paint and glitter above the liquid line always.
- Smooth, rounded ends; no chips or seams.
- Clean with mild soap, never harsh solvents.
Personalization Ideas
Now that the parts that touch the drink are safe, give the sticks a face and a story. Print tiny flags with the bride’s initials, or clip on a small charm that hints at her hobby, like a boot for a line dancer or a tiny book for a reader. Add a scannable tag that links to your Custom Playlist, so every stir kicks off the night’s soundtrack, which feels modern without trying too hard. Match stick colors and fonts to your Monogram Coasters, and you’ll tie the bar together like you meant it. Work in the date, the city, and the drink name, because details age well. Slip in a candid photo, cropped small, for a wink. Keep it personal, not precious, okay.
Easy Assembly Steps
Once the toppers are printed and the sticks are clean, lay everything out on a tray like you mean business. You don’t need fancy tools, just a steady hand, a clear plan, and a workspace layout that keeps mess in one corner and finished sticks in another. Think small assembly line; simple wins.
- Dry fit a topper to a stick to check size and balance; adjust margins; time estimates: 2 minutes per stick.
- Dot a pea of clear-drying glue, press topper, then sandwich with a matching backer; pinch for 20 seconds; lay flat.
- Wipe squeeze-out with a swab, rotate sticks so labels face the same way; batch in tens.
- Air-dry 30 minutes, stress-test in ice water, swirl and tap; touch up edges; pack upright.
Polaroid Guestbook Garland
Snapping and stringing is the whole game here: you set out an instant camera, a fat stack of film, some markers, and a run of twine with little clothespins, and guests take a pic, jot a note, and clip it up like laundry you actually want to look at. Hang one long line at eye level, then layer a second above or below for rhythm, and leave gaps so the bride’s folks and the college crew naturally mix. Place it by the snacks or the doorway to catch traffic. For Display arrangements, stagger short branches off a main line, like a family tree, and label with tiny tags for inside jokes. Lighting tips: aim a warm lamp across the wall, not straight on, so faces glow and glare stays quiet. Keep a backup battery, a tape roll, and a dry cloth ready. You’ll look prepared, because you are.
Scratch-Off Game Cards
You’re making scratch-off game cards, so you’ll need sturdy cardstock, a printer or bold markers, scissors or a craft knife with a ruler and mat, and scratch-off stickers or a quick mix of dish soap and silver acrylic paint under clear packing tape, plus a few coins for scratching. Print or write simple prompts that spark action without wrecking mascara—things like “Tell your favorite memory of the bride,” “Find someone who’s known her 5+ years,” or “Snap a selfie with the maid of honor.” Hide clean, small prizes under the silver—free drink tickets, a cute sticker, a mini candle, or “skip a dare”—the kind of thing folks actually want, because nobody cheers for a keychain that breaks by midnight.
Materials and Tools
Five simple supplies kick this off, and the rest are nice extras you probably have in a drawer. You’ll want card stock, clear tape, acrylic paint, a dab of dish soap, and a steady craft knife. Add a metal ruler and safety goggles for cutting, because cardboard slips and you don’t need a nick. Mix two parts paint to one part soap, stir smooth, and brush thin to build a clean scratch layer.
- Card stock (110 lb), crisp and sturdy.
- Clear packing tape for the glossy mask.
- Acrylic paint + dish soap, mixed in a bottle cap.
- Craft knife with fresh blade and a metal ruler.
Swap dull blades early; that’s tool maintenance that keeps edges clean and tempers steady, like coffee before traffic.
Prizes and Prompts
How do you keep everyone leaning in? You make simple scratch-off game cards that pop, and you tie every reveal to a small win or a nudge to speak up. Cut cardstock, paint a thin dish-soap and silver acrylic mix over sticker circles, and hide quick Icebreaker Prompts under the shine, like “tell your first job story” or “share the worst date snack.” People scratch, they talk, and the room warms faster than the chips.
Back it with Unique Rewards that don’t clutter bags, think mini coffee gift codes, nail decals, late-night rideshare credits, or a pass to pick the next song. Mix “wildcard” squares with one big prize, and you’ll pace the energy. Keep ten percent blanks, too, because suspense is fuel tonight.
Travel-Size Spa Kit Assembly
Gathering the good stuff into a travel-size spa kit is simple when you stick to small, leak-proof basics that actually get used. Start with a zipper pouch that wipes clean, then choose minis that pull double duty, like a face oil that tames flyaways and a balm that shines cuticles. Lean into Packaging aesthetics with clear labels and calm color, because a tidy kit gets opened, not lost. Think Scent layering, too, so nothing clashes in a shared ride or tiny room.
- Refillable spray: decant toner or face mist, add two drops of lavender, and you’ve got instant cool-down.
- Solid balm stick: lips, elbows, heels, done; it won’t leak when the bus hits a pothole.
- Mini sheet masks: fold two, slip in a card sleeve, and mark “bride” and “ride-or-die.”
- Travel cleanser: a pea-size gel in a flip-cap, labeled AM/PM, because guesses waste time.