If you purchase through them, we may earn a small commission at no extra cost to you.
See our Disclaimer for full details.
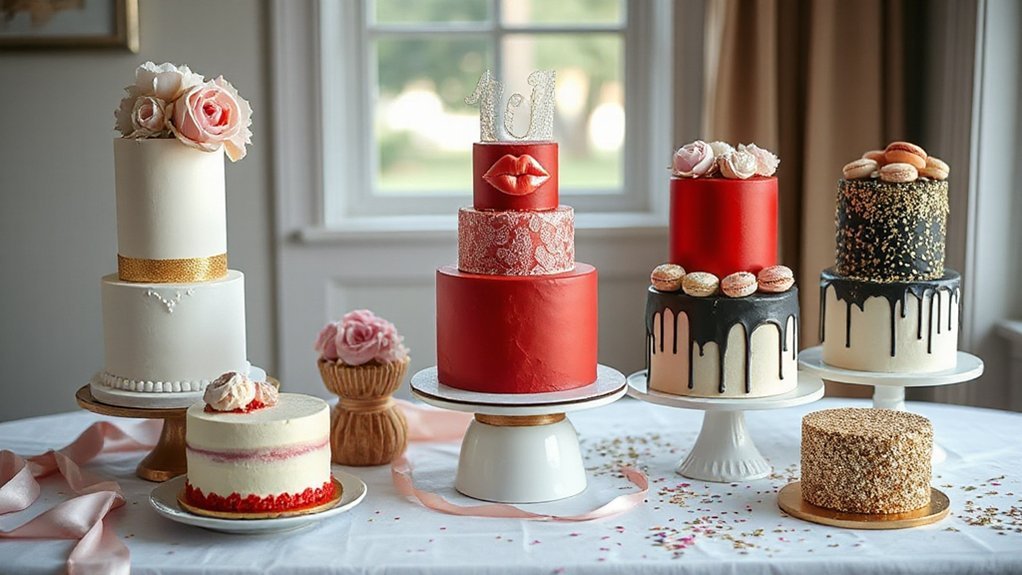
Here’s something you might not know: a simple white-on-white buttercream with tiny sugar buds can outshine a loud fondant scene, if you nail the texture and edges. You’ve got options, from boho semi‑naked with dried palms to a cheeky champagne‑bottle splash, even a disco‑ball stunner or a piñata reveal—flavors like lime‑coconut or espresso chocolate, too. Now, let’s pick the right showpiece—and keep it selfie‑ready from bakery box to last slice.
Key Takeaways
- Chic white-on-white floral buttercream with stacked petals, sugar pearls, and a low script topper for timeless elegance.
- Couture gold-leaf tiers with two-tone sugar roses and pearl accents for a luxe, fashion-forward centerpiece.
- Boho semi-naked cake with dried palms, bunny tails, and a hush honey caramel drip in earthy tones.
- Modern monochrome minimalist tiers in matte black, white, or stone with sharp edges and a low-profile topper.
- Saucy lingerie bustier cake with corset lace, edible ribbon ties, and pearl details for playful sassy vibes.
Chic White-on-White Floral Buttercream
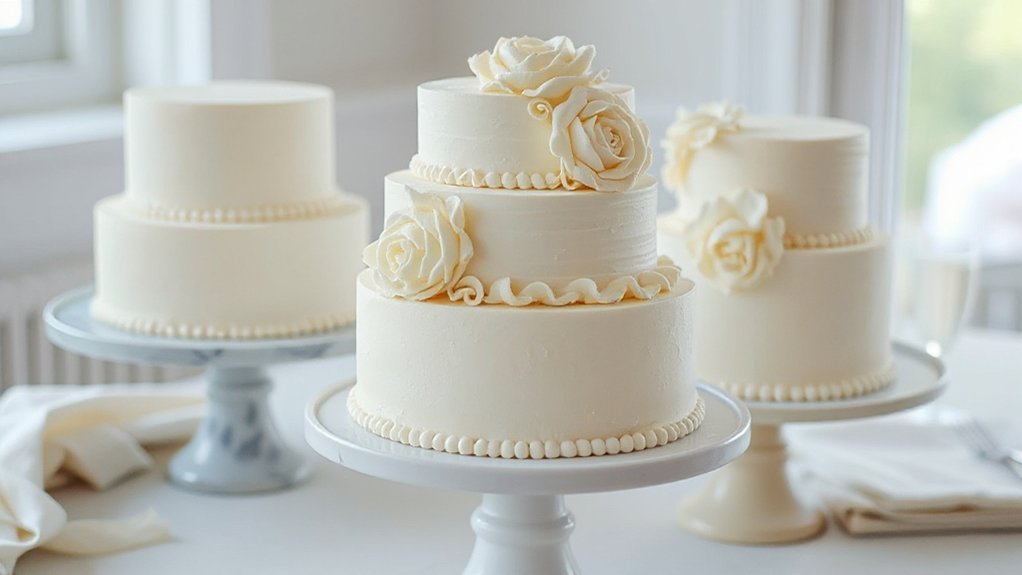
Even if the theme gets wild everywhere else, a chic white-on-white floral buttercream cake keeps the table looking calm and pulled together. You pick a tall round, smooth it like fresh paint, then build the blooms right on the sides, and you let the light do the fancy work, you’ll see. With smart Piping techniques, you can stack petals in tight rings, add ruffled edges, and tuck tiny buds between them, and it’s modern, not frilly. For Texture contrast, mix glossy Swiss meringue with matte micro-spatula swipes, then press in a few sugar pearls, like shirt buttons that know their job. Keep the palette clean, ivory on bright white, so shadows outline the flowers without yelling. If you want a topper, go low and simple, a short script or a slim sugar ribbon, because the petals already carry the room. It photographs like air before fireworks at night.
Boho Dried Florals and Semi-Naked Cake

If that clean white buttercream felt like a deep breath, this boho semi-naked cake feels like kicking off your heels in soft grass. You let thin layers peek through, so the crumb shows, giving Rustic texture without fuss. You tuck in dried palms, bunny tails, little ruscus sprigs, then add a few rose buds that look sun-kissed. The Earthy palette runs warm—oat, clay, sand, a wink of copper—so it plays nice with linen, wood tables, and soft candlelight.
Keep tiers modest, then offset them for movement, like wind in a field. Drip a hush of honey caramel, not a flood, and you’ll get gloss without shouting. Use vanilla bean or spiced chai, since those specks read honest and smell like camp mugs. Transport stays easy, since the sides aren’t overloaded, and slices cut clean. After the toast, you’ll see crumbs on plates and bouquets still crisp—proof it worked.
Modern Minimalist Monochrome Tier

While it looks simple at first glance, a modern minimalist monochrome tier is really a study in restraint that reads polished and pricey without trying. You’re betting on clean lines, sleek silhouettes, and one bold tone that says you planned this on purpose, not because you ran out of ideas. Matte finishes keep the light soft, so the cake photographs like a dream and sits easy next to modern glassware and black napkins.
Pick a single shade—inky black, cloud white, or cool stone—and carry it through buttercream, ribbon, and stand, then stop, that’s the trick. Go for sharp edges, even tiers, and a low profile topper, maybe a tiny acrylic script or nothing at all, and you’ll feel the calm click into place. Flavor can still flex: think lemon with basil syrup, dark chocolate with espresso, or vanilla bean with tart raspberry, simple, sure, but far from plain.
Gold Leaf Accents With Sugar Roses
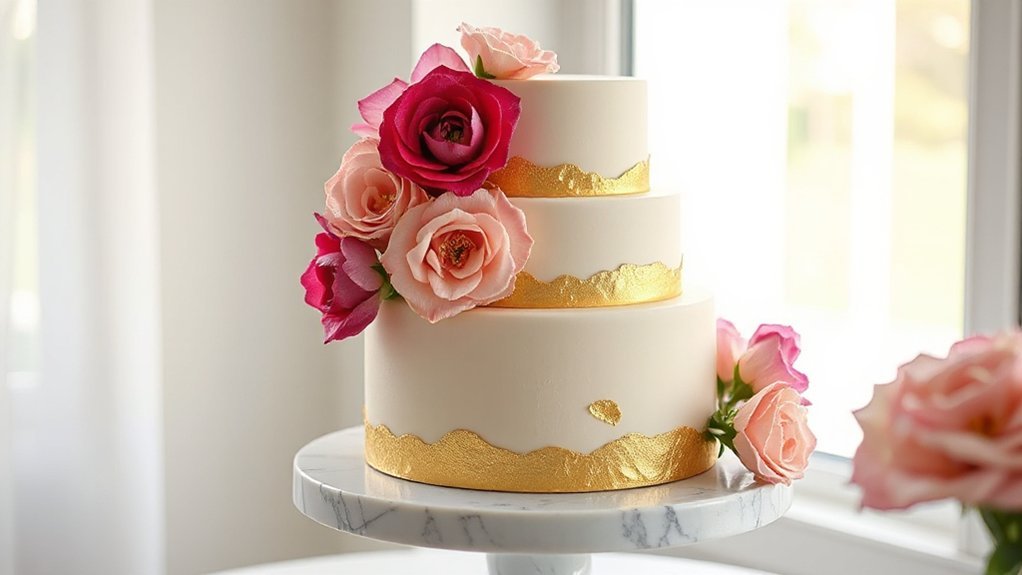
You’ve set the stage with clean lines and hush-toned tiers, so now let’s let a little shine in—gold leaf that catches the light and sugar roses that look like they were snipped at dawn. Start with a chilled buttercream or fondant finish, smooth as a creek stone, then map your gold, pressing sheets with a soft brush and a steady wrist. Use smart adhesion methods: a whisper of vodka or lemon extract on the surface, tacky not wet, so the leaf hugs without tearing. Build your sugar roses in two tones, blush at the heart and warm ivory at the rims, and wire petals on floral tape so you can angle them like real stems. Anchor clusters with food-safe picks and a dot of royal icing, then step back and edit. For transport tips, box tall, wedge non-slip mats under, and add cool packs like you mean it.
Champagne Bottle Splash Cake
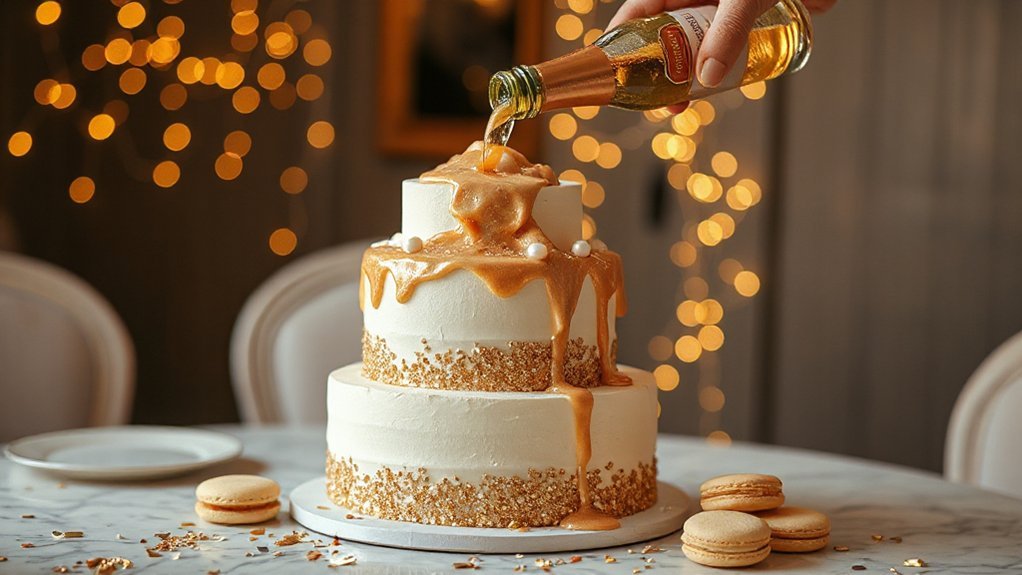
A tilted bottle and a frozen splash make this cake look like the toast just happened, right there on the table. You set a clean, light bottle at an angle, and folks lean in, because it feels like it’s still pouring. To pull this off, you build a sturdy base, add hidden structural supports, and run a food-safe dowel up through the cake and into the bottle neck, so nothing wiggles when the room gets loud. The splash can be clear isomalt or melted sugar, poured over a silicone form, with thin shards that catch light like real bubbles, and yes, they snap if you rush. For texture, pipe thick gel and tuck in faux bubbles—tiny sugar pearls, molded spheres, even clear gelatin drops—clustered where spray would land on a table edge. Keep the flavors clean and bright, citrus and vanilla, so the sparkle outside matches the bite.
Rosé All Day Drip Cake
You get that Rosé All Day look by pouring a rosy ganache drip that slides in slow ribbons over smooth buttercream, like sunset streaks on a porch rail. Lay on a few gold leaf flakes along the rim and on a couple drips so they catch the light like earrings in a window, then stop while it’s pretty, not loud. Top it with a few fresh strawberries or a neat cookie, keep the colors soft pink and cream, and you’ll have a cake folks photograph before they cut the first slice.
Rosé Ganache Drip
Blush-pink ganache sliding down a tall vanilla cake sets the tone for a Rosé All Day drip that feels fancy without fuss, the kind of pretty that says bachelorette without shouting it. You make the ganache with white chocolate, a splash of reduced rosé, a knob of butter, and a squeeze of lemon, then blend till glossy and cool it to about 90 degrees so it drips slow and clean on a well-chilled cake. For Serving Suggestions, slice after toasts, pair with cold rosé and fresh berries, and watch folks nod like, yep, that’s the spot. Storage Tips: tent the cake, chill overnight, then bring it out thirty minutes before cutting so the crumb softens. Travel smart with freezer packs and a non-slip mat.
Gold Leaf Accents
While the rosé drip does most of the talking, a few flashes of edible gold leaf are the quiet jewelry that set it off. You place thin sheets with a dry brush, let them catch on the tacky ganache, and step back because the shine does more than a dozen sprinkles ever could. Buy real edible gold, and check sourcing ethics, since you want sparkle without a side of yuck. Tear pieces, don’t chase perfect edges, and float them along the drip line like confetti after last call. For storage tips, keep the leaf sealed, no drafts, no damp, and keep the finished cake cool, not cold. Box it snug for travel, and you’ll deliver a hush, then a grin, right when lights dim.
Lingerie Bustier Couture Cake
How about giving the bride a wink with a lingerie bustier couture cake that looks like a corset right off a dress form, all curves, laces, and a neat satin sheen. You start with tall tiers, carve the waist gentle, then panel fondant like fabric, and you dust soft shadows so the shape reads from across the room. Use Boning techniques in sugar, pressing slim grooves and adding edible eyelets so the structure feels real but stays light. Tie it up with Silk ribbons made from thin fondant strips, brushed with cocoa butter for that quiet gleam.
A couture corset cake: curved tiers, fondant panels, sugar boning, satin gleam, tied in blush ribbons
- Pick flavors that match the look: dark chocolate base, raspberry core, and vanilla cream that cuts sweet.
- Add a tiny tag with the bride’s initials; it’s small, it lands.
- Airbrush blush tones, keep them warm, not loud.
- Deliver on a mannequin-style stand, sturdy, grippy, no wobbles.
That way, it travels easy.
Corset Lace and Pearls Design
Even with a quiet color palette, a corset lace and pearls design feels fancy without fuss, the kind of pretty that reads from across the room and still holds up when folks lean in for photos. You’re aiming for a crisp Victorian Silhouette, but you want it modern, so you stack clean tiers, smooth the fondant like glass, and lace it with sugar cords that cinch like a real bodice. Add Delicate Embellishment with hand-piped eyelets, tiny pearl dragees, and a satin-finish ribbon you can actually eat. Keep flavors brave but balanced—think champagne cake, white tea buttercream, or lemon-thyme.
| Element | Pro tip |
|---|---|
| Lace panels | Use stencil, then overpipe for shadow and lift. |
| Pearl lines | Mix sizes, follow curves, stop before the seams. |
Display it on a mirrored stand, and the light does half the talking, which is handy when the room runs dim. Send extras home in style.
Cheeky Peach and Heart Emoji Cake
After all that buttoned-up lace, you might want to let the cake wink a little, so cue the Cheeky Peach and Heart Emoji Cake that says “we came to party” without shouting. You lean into playful, not crude, because emoji etiquette matters when Aunt is in the room and the group chat is watching. Think coral buttercream, a fondant peach with a leaf, and candy hearts marching like confetti, it’s bold but tidy and photographs clean.
Playful, not crude: a peach-and-hearts cake that winks and stays classy.
Here’s how you pull it off without fuss, tonight:
- Pick a palette: sunset pinks, ripe peach, and a pop of cherry red for the hearts.
- Keep the shapes simple: one big peach, three small hearts, crisp edges, no extra clutter.
- Use peach symbolism smartly: toast sweetness, growth, and good luck, not just a wink.
- Mind serving lines: pre-score slices so the emoji stay intact and nobody wrestles frosting.
Disco Ball and Edible Glitter Cake
You set the tone with a sparkling disco ball topper that actually looks the part, think a sturdy fondant or isomalt sphere coated in silver dragees or sanding sugar and set on a food‑safe skewer so it doesn’t wobble when the music starts. For the glitter, you brush on edible luster dust mixed with a little vodka or lemon extract, press extra sparkle into a thin smear of piping gel, and stick to real edible glitter or punched gelatin “confetti,” not that craft stuff that ends up in your teeth for a week. Keep flavors bright and party‑ready—champagne vanilla with raspberry, or chocolate with espresso—and run a clean palette of silver and black with a pop of hot pink or electric purple so the shine reads bold and not messy.
Sparkling Disco Ball Topper
A tiny mirror ball perched on buttercream turns a plain cake into a dance floor, and it does it fast. You want shine that holds steady while everyone toasts, so pick a food-safe disco ball topper and plan your Attachment Options before frosting. I’ve seen toppers slide like a bad DJ set, but a hidden dowel and a firm chill fix that quick. Keep Hygiene Standards tidy: wrap stems, wipe the ball with vodka, and handle with gloves, not sticky fingers.
- Choose a lightweight, food-safe mirror ball, not craft glitter.
- Anchor with a straw sleeve and a wooden dowel.
- Add two mini balls on skewers for height and rhythm.
- Set a clip-on light nearby, and cue the sparkle.
It looks bold, not bulky either.
Edible Glitter Techniques
While a disco ball topper steals the scene, edible glitter lets the whole cake join the party without shedding craft sparkle all over the table. You’ll make a simple buttercream look stage-ready with a shimmer that sticks, and you won’t chase confetti across the floor later. Buy glitter labeled edible, not “non-toxic,” and follow Safety Standards. Lightly chill the cake, then pick Application Methods that fit your timeline: soft brush, pump spray, or vodka paint. Test a small patch first, because humidity changes glide, and keep your touch easy.
| Tip | What to Do |
|---|---|
| Choose | Verify “edible,” brand, and lot date. |
| Prep | Chill cake 10–15 minutes for tack. |
| Apply | Brush, pump, or paint in thin passes. |
| Finish | Set, then box to avoid smears. |
Theme secured.
Flavors and Color Palette
Often the best disco cakes start with bright, clean flavors and a cool, simple palette that lets the sparkle do the shouting. You want flavors that hit fast, then leave room for the show, so think zesty citrus, tender vanilla, and Herb infusions that whisper, not yell. Keep your color story tight: silver, pewter, and black as anchors, with Jewel tones popping like stage lights so the edible glitter doesn’t fight your frosting.
- Pick lemon–vanilla layers, then brush with thyme syrup; it’s bright, and it behaves.
- Frost in satin gray buttercream, then mirror with silver leaf on a few panels.
- Add blueberry compote for a midnight note and clean cuts.
- Finish with edible glitter “tiles,” dense near the top, fading down.
That stays sharp.
Tropical Palm and Pineapple Vibes
If you’re chasing that breezy island mood without plastic leis, lean into palms and pineapples on the cake. Paint loose palm shadows on buttercream, then perch a sugar pineapple on top, a little tilted like it rode in a beach bag. Keep the palette sunlit—jade, lime, soft gold—and dust the base with toasted coconut that crunches like boardwalk sand. Sync the look to the Beach playlist and hang Lei garlands by the sweets, so the vibe hums in step. Fill layers with lime curd, brush on mellow rum, and add a smart pinch of sea salt; folks taste bright, then warm, then grin. Go for wafer-paper leaves that flutter when you walk by, not clunky plastic. If you want names, stencil them in cocoa on board, tidy and easy to wipe.
| Element | Material | Why it works |
|---|---|---|
| Palm fronds | Wafer paper | Light, moves |
| Pineapple crown | Modeling chocolate | Carves clean |
Passport-Ready Mini Travel Cakes
You can set the tone fast with passport-ready mini cakes, each one a little personal map, so guests feel like they’re boarding the trip with you, not just grabbing dessert. Stamp the tops with edible “postmarks” from Paris or Cabo or Vegas, use fondant or wafer paper, add a smudge and a circle line like a real stamp, and it suddenly looks like it rode in someone’s carry-on, crumbs and all. Finish with luggage tag toppers, neat little cookie or fondant tags with each guest’s name or seat “A12,” tied on with a short bit of twine so they’re cute and easy to grab, which is the whole point when you’re wrangling a crowd.
Destination Stamp Designs
Why do passport-ready mini travel cakes work so well for a bachelorette send-off? Because you can stamp each one with places that matter, the story shows up right on the icing, with postcard motifs and vintage cancellations pressed in sugar. Pick the bride’s first city, and let clean stamps talk, all night.
- Use edible wafer-paper stamps, crisp borders, and a clear glaze so colors stay bright all night long.
- Airbrush soft postmark rings, layer dates and codes, then dust edges with cocoa for pocket-worn charm details.
- Mix map-tone palettes—sea blue, clay, olive, taxi yellow—and add one metallic foil accent for snap at twilight.
- Personalize one mark with coordinates or an inside joke; keep fonts simple so guests can read easily.
Luggage Tag Toppers
How do you say bon voyage on a bite-size cake without shouting? You make luggage tag toppers, tidy little tags that look like they’ve flown coach and lived to tell it, and you tuck them on passport-ready mini cakes. Cut fondant rectangles, round two corners, punch a hole with a straw, and thread a tiny licorice strap. Stamp the bride’s initials, flight codes, or a cheeky “Gate BAE.” Do quick Durability testing: set one in the fridge, one under lights, and one on a ride in the car, then see which curls, bleeds, or cracks. Adjust Adhesive methods accordingly, using royal icing dots or melted chocolate, not buttercream slip. Box each cake snug, like carry-ons, so nothing wanders. Label flavors, note allergens, and relax.
Cupcake Tower With Mix-And-Match Toppers
When the guest list stretches long and the vibe needs a little color, a cupcake tower with mix-and-match toppers steps up fast. You get bite-size joy, no forks, no fuss, and a skyline of frosting that looks like a little city at golden hour. Pick two or three base flavors, then swap toppers like sunglasses: tiny rings, disco balls, initials, and a cheeky “yes” or two.
Bite-size joy, no forks, no fuss—frosting skyline at golden hour with mix-and-match toppers
- Map Assembly logistics first: stack a sturdy stand, heaviest cupcakes low, lighter minis higher, and leave finger space for quick grabs.
- Do Stability testing before guests arrive: give the stand a gentle wobble, fix tilts, and rotate plates so weight spreads even.
- Batch frost in one color family, then add topper sets so rows read playful, not messy.
- Set a refuel tray behind the tower, ready to swap in fresh cakes before gaps show.
Service fast, photos pop.
Macaron-Crowned Single-Tier
After that skyline of cupcakes, maybe you want one clean centerpiece that says “we planned this” without shouting, and a macaron-crowned single-tier does that job neat as a pin. You pick a tight 6- or 7-inch cake, frost it smooth, then set a simple ring of macarons on top like bright little helmets that say party but also grown-up. For Structural Stability, pipe a buttercream ridge to seat each macaron, chill the cake till that ridge firms, and glue the crown with dots of ganache, which grips better than wishful thinking. If you want height, tuck a trimmed skewer through a few shells at the back, hidden, so bumps on the Uber ride don’t win. Storage Tips are plain: chill the cake, store macarons in an airtight tin, and assemble an hour before showtime so they don’t drink fridge moisture. Slice clean, wipe the knife, and pass plates.
Donut and Cake Hybrid Stack
Party-brunch meets dessert table in a donut-and-cake stack that looks wild at first glance but builds easy if you think like a carpenter and not a magician. You’ll layer a short cake, then rings of donuts, then more cake, like a tiny skyline that says party without yelling. Keep the crumb tight, the donuts fresh, and the plate level, and you’re most of the way there. Use bold Glaze Techniques so each tier catches light, and keep drips tidy, like paint with a good edge.
- Start with a six-inch cake, trimmed flat, then add dowels for steady Tower Assembly.
- Nest cake rings with cake donuts, alternating flavors, so each bite plays nice.
- Dip and flick glazes in two tones; finish with a gloss coat for camera-proof shine.
- Crown with a donut hole garland, fresh citrus slices, and a spark, then chill.
Serve with contrast.
Smashable Piñata Heart Cake
You set out a hollow chocolate heart on a sturdy board, hand over a small wooden mallet, and when you crack it, the shell gives with a clean snap and a shower of gummies, mini truffles, and bright sprinkles lands on the table like confetti that actually gets eaten. Keep the chocolate about a quarter inch thick so it breaks easy but doesn’t blow apart, and line the inside with parchment so the hidden candy surprise slides out instead of sticking like gum on a shoe. Fill it with wrapped sweets, a few foil kisses, maybe a tiny note or dare for the bride, and you’ve got a sweet moment that lets everyone take a swing without breaking anything else.
Hollow Chocolate Heart
A hollow chocolate heart hits that sweet spot where cute meets cathartic, because it looks like a glossy love token on the table and then cracks open with a clean whack to spill out the fun. You’ll temper your chocolate, then use Molding Techniques, rotating the mold so the walls set even and glossy. For Structural Stability, brush a second coat around the rim, since that’s where cracks can go wild. Chill, release, and seal the halves, and set the heart on a sturdy cookie base so it doesn’t skate off the board. Add a tiny wooden mallet and a wink of gold dust, and you’ve got a ritual guests remember.
- Use polycarbonate molds for snap.
- Warm mold to avoid shock marks.
- Pipe a rim seam, smooth with a gloved finger.
- Score a light line to guide the hit.
Hidden Candy Surprise
After cracking open that glossy chocolate heart, it’s only fair to go bigger and hide a whole stash inside so the first whack turns into a shower of candy and cheers. You line the mold, paint it thick, then build in secret cavities with extra chocolate walls, so the shell holds up when the bride gives it a good smack. Fill those candy pockets with gummies, malt balls, tiny bottles of sprinkles, and a love note folded small, because surprises don’t need to be fancy to feel rich. Seal the seam warm and smooth, add a bold stripe or gold dust, and set out a wooden mallet. Hand over safety glasses, count down, and let the room flip from hush to whoops and hugs.
Fault Line Cake With Confetti Reveal
Knife meets frosting and a bright fault line pops open, spilling a confetti mix like a pocket of party lights, which is exactly the kind of ta‑da a bachelorette crowd remembers. You build it like a little earthquake, cake layers hugged in buttercream, then a rough strip left bare for the crack, so sprinkles show when you slice. To keep Layer Stability, stack even rounds, trim domes, and chill between coats, because warm cake slides like loose gravel. Use a firm Sealing Technique: pipe a ring of buttercream around the cavity, pour in mixed shapes—jimmies, stars, a few metallic pearls—and cap it snug.
Slice releases a glittering fault line, spilling party-confetti from buttercream-hugged, earthquake-styled layers.
- Sketch the crack line, so the reveal hits center, not the wings.
- Marble the coat; a palette knife makes rocklike edges.
- Add glitter lightly; you want sparkle, not grit.
- Cut with a hot knife, pause, let confetti tumble for photos and cheers all around, truly.
Ombre Pink-to-Red Romance
Blending pink into red turns a simple cake into a slow sunset, and you can pull it off without fancy tricks if you set yourself up right. Start with three bowls of buttercream, all the same base, then tint light blush, mid-rose, and bold cherry, and leave a little white on standby. Chill your crumb-coated cake, then use the ombre technique: swipe the light shade around the top third, the mid in the middle, the red on the bottom, and smooth with a hot bench scraper, wiping as you go. When the colors blur just enough, stop; overwork and you’ll get mud.
To lock the romantic palette, add ribboned strawberries, pretty rose petals, and a soft brush of pearl dust along the seams. Pipe tiny dots where your hand slipped, call them intentional, and keep moving. It’s clean, modern, and sweet as a toast without the sugar crash.
Black Velvet With Edible Gold Splatter
A black velvet cake with gold splatter looks bold and a little wicked, and it’s easier than it lets on. You bake your favorite red velvet, swap the dye for black, and cover it in smooth, dark buttercream, then let the matte contrast do the talking while the gold brings the wink. I’ve done this for late-night toasts, and it always lands, like a leather jacket over a silk dress, tough and shiny.
- Chill the frosted cake so the surface sets firm, because cold buttercream takes splatter clean.
- Mix edible gold dust with clear alcohol to a paint, thin enough to flick, thick enough to sparkle.
- Use a stiff brush, pull back with your thumb, and flick in arcs, testing on parchment first.
- Finish with luxe styling: a few blackberries, a slim black ribbon, and one candle.
Set it out, and watch phones rise.
Citrus Zest With Pressed Flowers
You go with a lemon-lime flavor that hits bright and clean, the kind that wakes up the table and doesn’t leave that heavy sugar fog. You press edible flowers like violas, pansies, and calendula flat a day ahead, then set them around the sides like little postcards from spring, and yes, a light brush of syrup keeps them snug. You finish with a zesty buttercream, packed with fresh zest and a squeeze of juice, spread in soft swoops that catch the light, and no one misses the fondant, not for a second.
Lemon-Lime Flavor Profile
Sunshine in slices, that’s what a lemon-lime cake brings to the bachelorette table, bright and clean and a little cheeky. You want snap without sting, so you chase acid balance with real zest, fresh juice, and just enough sugar to land soft. I like a tender crumb brushed with citrus syrup, then a silky frosting that lets the tart notes talk, not shout. For herbal pairing, keep it crisp and green; think garden, not perfume. Here’s how you steer it:
- Beat zest into sugar first, so the oils bloom and the whole bowl smells sunny.
- Fold in lime curd ribbons for little pockets of tang.
- Brush layers with lemon-lime simple syrup.
- Finish with basil-mint micro-specks in the buttercream, tiny but bright.
Clean, vivid, ready.
Pressed Flower Accents
Pressing little blooms into soft buttercream turns a citrus cake into a garden path, bright with lemon-lime zest and steady enough to carry to the party without fuss. You pick thin petals that dry flat, like violas, pansies, and chamomile, and you press them ahead so they don’t bleed, then you chill the cake, and set each flower with a light thumb tap. Follow simple Pressing Techniques: blot, press, rest, and test on a spare cupcake first, it saves cussing later. Keep an Identification Guide handy so you only use edible flowers, no guesswork when folks are toasting. Aim for a winding trail up the side, tuck zest curls as markers, and stagger colors so the eye walks, not sprints. Take your time, friend.
Zesty Buttercream Finish
After the flowers are pressed and waiting, give the buttercream some zip so the cake tastes as lively as it looks. Rub lemon, lime, and orange zest into sugar till it smells bright, then whip it into room‑temp butter so the oils bloom. Mind temperature control like you mind traffic; warm frosting slumps, cold frosting cracks, and neither holds flowers well. Keep the mix steady with tidy stabilizer ratios, a spoon of cornstarch or milk powder per cup of sugar, nothing fussy.
- Chill the crumb‑coated cake ten minutes, so the citrus spread grabs, not slides.
- Swipe on a thin zingy coat, then a smooth final pass.
- Press flowers gently with parchment, no fingerprints.
- Finish with micro‑zest confetti, edges clean, and corners that stay sharp.
Strawberry Prosecco Drip Cake
Though it looks showy, a Strawberry Prosecco drip cake is straight talk simple once you break it down, and it tastes like a toast baked into layers. You bake soft vanilla rounds, brush them with a quick Prosecco syrup, then stack with strawberry compote and a light mascarpone whip that holds steady without fuss. Reduce the wine to boost the sparkle, cool it, and whisk it into a white chocolate drip so it slides slow and glossy, like party lights down a wall. For assembly timing, chill each layer thirty minutes, crumb coat, chill again, then drip on a cold cake so the edges stay tidy. Scatter freeze‑dried berries and a whisper of gold for a wink, not a shout. For transport tips, box it snug, add a non‑skid mat under the board, and keep it cool, because bubbles like calm, not potholes. Keep icing tools handy, friend.
Gluten-Free Almond Raspberry Torte
You build it on a tender almond flour sponge that stays moist and nutty, not crumbly like some GF cakes, so it slices clean and holds up on a warm night. You simmer raspberries with a spoon of lemon and a pinch of sugar till jammy, then spread thin layers between the rounds so every bite hits sweet-tart and keeps the crumbs from drying out. Top with fresh berries and a dust of powdered sugar, park it in the fridge till the toasts start, and you’ll have a pretty, no-fuss showpiece that even the gluten-free friend cuts into first, which tells you everything.
Almond Flour Sponge
Meet the almond flour sponge that turns into a gluten-free raspberry torte without fuss, tender as a hug and sturdy enough to travel to the hotel suite. You’ll whisk fast, fold slow, and pull a cake that slices, smells nutty, and doesn’t crumble when the party moves.
- Measure smart: use baking ratios—2 parts almond flour, 2 parts egg, 1 part sugar, a kiss of oil—so the crumb stays balanced.
- Whip eggs till ribbons, for lift without wheat; this is your air pump, not a gym membership.
- Fold in dry mix with a wide spatula, quarter turns, for texture optimization and no sinkholes.
- Bake low and slow at 325°F, line the pan, cool upside down on a rack, then wrap tight for a smooth carry.
Raspberry Compote Layers
A small pot of raspberries sets the tone, bright and tart, and it keeps that almond sponge honest. You simmer the fruit with lemon and a spoon of sugar until the bubbles calm, then you cool it so the shine holds and the sweetness balance stays steady. For layer stabilization, stir in a little chia or a cornstarch slurry, not fussy, just enough grip. Spread thin, right to the edge, and let it soak the crumb a touch, not the plate. Don’t flood it; you want glide, not slide. The whole gluten-free almond raspberry torte comes off poised, party-ready, and real.
| Move | Payoff |
|---|---|
| Macerate 10 min | Juicier, less sugar |
| Strain half seeds | Silkier spread |
| Chill layers 15 min | Firmer stack |
| Buttercream dam | No leaks |
Dairy-Free Coconut Passionfruit Cake
When a crowd includes dairy‑free folks, this coconut passionfruit cake keeps everyone in the mix without feeling like a compromise, and that matters at a bachelorette where the whole table should get a slice. You lean on coconut milk, oil, and shredded coconut for richness, then brighten it with tart passionfruit curd that doesn’t need butter to shine. For Texture optimization, you whisk aquafaba until foamy, fold it in, and get lift like a summer quilt, light but steady. Keep an eye on Shelf life: the crumb stays tender two days chilled, and the curd holds tight, so you can bake ahead and breathe easy.
- Bake thin layers for faster chill and clean stacking.
- Brush with passionfruit syrup; it seals crumbs and sparks flavor.
- Frost with whipped coconut cream stabilized with a spoon of starch.
- Finish with toasted coconut shards, lime zest, and edible flowers.
Serve cool, smiling.
Vegan Chocolate Strawberry Naked Cake
Chocolate layers and ruby strawberries make a naked cake that looks party‑ready without fussy piping, the kind you can carry to the table and everyone leans in. You’ll build it smart and simple, with cocoa sponges brushed in vanilla syrup, a swipe of coconut cream, and sliced berries that shine like little jewels. Ingredient sourcing matters, so pick fair‑trade cocoa, oat milk that steams clean, and strawberries that smell like summer, not water.
| Move | Why it works |
|---|---|
| Bake thin rounds | Faster chill, cleaner stacks |
| Chill layers | Firmer crumbs, easier spread |
| Ring a cream dam | Keeps berry juices in |
| Scrape sides lightly | Signature naked look |
Now focus on Texture layering that hits. You want tender crumb, cool cream, bright fruit, and a soft snap of shaved dark chocolate on top, so every forkful stays balanced. Stack steady, press just enough, and don’t chase perfect edges; the seams sell it.
Budget-Friendly Sheet Cake Glow-Up
Turning a plain 9×13 into a party piece is all about small, cheap moves that read big, the kind you can do with a grocery cart and a steady hand. You start with Boxed mixes, they’re fast and forgiving, then you push flavor with browned butter, a splash of coffee, or lemon zest. Chill the sheet, level the hump, and lay on a thin crumb coat so the finish goes smooth and shiny, like you meant it. Real tidy work, friend.
- Do DIY stenciling with cocoa or colored sugar; hold a paper cutout steady and tap a sieve, and boom, crisp shapes.
- Pipe borders with a zip bag, snip the tip small, and trace clean lines and dots.
- Stack two halves with jam in the middle, instant layer cake mood on a budget.
- Garnish smart: sliced strawberries, sprinkles, and a store flower, stems wrapped.